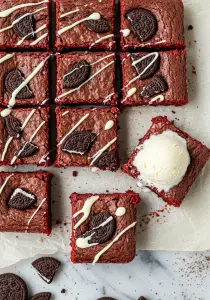
If you love rich, fudgy brownies and can’t resist the classic charm of red velvet, these Red Velvet Oreo Brownies are calling your name! With a deep red hue, swirls of creamy chocolate, and chunks of Oreo cookies in every bite, this dessert is the ultimate indulgence. Perfect for parties, holidays, or any day you want to treat yourself, these brownies are a guaranteed crowd-pleaser.
Want recipes like this delivered straight to your inbox? Subscribe now to get the latest culinary creations you’ll love.
Why You’ll Love This Recipe
Triple Chocolate Delight – Red velvet base, chunks of Oreo, and melted chocolate make each bite heavenly.
Easy to Make – One bowl, minimal fuss, and ready to bake in under 15 minutes.
Beautiful Presentation – That red velvet and black Oreo contrast looks stunning on any dessert table.
Perfect Texture – Fudgy center with a slight crisp top and crunchy Oreo bites.
Versatile Treat – Great for birthdays, bake sales, or even a romantic dessert.
Ingredients You’ll Need
For the Red Velvet Brownie Batter:
- ½ cup unsalted butter (1 stick), melted
- ¾ cup granulated sugar
- ¼ cup brown sugar
- 2 large eggs
- 1 tbsp red food coloring (liquid or gel)
- 1 tsp vanilla extract
- ¾ cup all-purpose flour
- ¼ cup unsweetened cocoa powder
- ¼ tsp baking powder
- ¼ tsp salt
For the Oreo Layer:
- 12–15 Oreo cookies, roughly chopped
- ½ cup semi-sweet or dark chocolate chips (optional but recommended)
For Topping (Optional):
- 3–5 extra Oreos, crushed for garnish
- White chocolate drizzle or cream cheese frosting (optional)
Tools You’ll Need
- Mixing bowl
- Whisk or electric hand mixer
- Rubber spatula
- 8×8 inch baking pan
- Parchment paper or nonstick spray
- Cooling rack
- Knife for slicing
Step-by-Step Instructions
Step 1: Prep Your Pan and Oven
- Preheat the oven to 350°F (175°C).
- Line an 8×8-inch baking pan with parchment paper or grease well with nonstick spray.
Step 2: Make the Red Velvet Brownie Batter
- In a large bowl, whisk together melted butter, granulated sugar, and brown sugar until smooth and glossy.
- Add eggs, red food coloring, and vanilla extract. Whisk until fully combined.
- Sift in flour, cocoa powder, baking powder, and salt. Fold gently with a spatula until just combined—don’t overmix.
Step 3: Add Oreos and Chocolate Chips
- Gently fold in the chopped Oreos and chocolate chips (if using) until evenly distributed throughout the batter.
Step 4: Bake the Brownies
- Pour the batter into the prepared pan and spread evenly.
- Press a few extra crushed Oreos on top for a dramatic finish.
- Bake for 28–32 minutes, or until a toothpick inserted comes out with a few moist crumbs (not wet batter).
- Let the brownies cool completely in the pan on a cooling rack.
Step 5: Slice and Serve
- Once cooled, lift the brownies out using the parchment paper.
- Slice into squares or bars.
- Drizzle with white chocolate or top with a swirl of cream cheese frosting for extra decadence (optional but amazing).
Tips for Perfect Red Velvet Oreo Brownies
Don’t Overbake – Brownies continue to cook slightly as they cool. A toothpick with a few crumbs means they’re ready.
Use Gel Food Coloring – For a deeper red without altering the texture.
Make It Extra Fudgy – Slightly underbake by 1–2 minutes if you love gooey centers.
Chill Before Cutting – For cleaner, neater slices, refrigerate for 30 minutes before slicing.
Add Frosting – Cream cheese frosting adds that classic red velvet touch.
Serving Suggestions
With Ice Cream – A scoop of vanilla or cookies and cream ice cream makes it irresistible.
Drizzled with Chocolate – White or dark chocolate adds a beautiful finish.
Holiday Platter – Combine with red and white treats for a festive dessert table.
Romantic Dessert – Serve with strawberries and whipped cream for a sweet date-night dish.
How to Store & Freeze
Storing:
Room Temperature: Store in an airtight container for up to 4 days.
Refrigerate: For extra longevity, keep in the fridge for up to 1 week. Bring to room temp before serving.
Freezing:
Freeze in a single layer in an airtight container or wrap individually. Best enjoyed within 2 months. Thaw in the fridge overnight or at room temperature for a few hours.
Frequently Asked Questions
- Can I use boxed red velvet mix?
Yes! Just reduce any added cocoa and follow the box instructions for a brownie-like consistency. - Can I substitute the Oreos?
Sure—try chocolate sandwich cookies, peanut butter cookies, or even chocolate chunks. - Is this recipe kid-friendly?
Absolutely! It’s a fun and colorful treat that’s perfect for birthdays and school parties. - Can I make this dairy-free?
Yes! Use plant-based butter and dairy-free chocolate chips. Double-check that your Oreos are vegan (most are!). - How do I make them more cakey?
Add an extra egg and reduce the butter slightly for a fluffier texture.
Final Thoughts
These Red Velvet Oreo Brownies are everything you want in a dessert—rich, chocolaty, slightly tangy, and studded with crunchy cookie goodness. They’re incredibly easy to whip up but taste like something straight out of a bakery. Whether you’re baking for a crowd or just treating yourself, this dessert brings major wow-factor with minimal effort.
Bake a batch, snap a photo, and share your red velvet creation—I’d love to see how yours turns out!
Preparation Time: 15 minutes
Cooking Time: 30 minutes
Cuisine: American
Nutritional Information (Per Serving):
Calories: 320 | Protein: 4g | Carbohydrates: 38g | Fat: 18g | Fiber: 2g | Sodium: 210mg

Red Velvet Oreo Brownies
- Total Time: 45 minutes
Description
If you love rich, fudgy brownies and can’t resist the classic charm of red velvet, these Red Velvet Oreo Brownies are calling your name! With a deep red hue, swirls of creamy chocolate, and chunks of Oreo cookies in every bite, this dessert is the ultimate indulgence. Perfect for parties, holidays, or any day you want to treat yourself, these brownies are a guaranteed crowd-pleaser.
Want recipes like this delivered straight to your inbox? Subscribe now to get the latest culinary creations you’ll love.
Ingredients
For the Red Velvet Brownie Batter:
-
½ cup unsalted butter (1 stick), melted
-
¾ cup granulated sugar
-
¼ cup brown sugar
-
2 large eggs
-
1 tbsp red food coloring (liquid or gel)
-
1 tsp vanilla extract
-
¾ cup all-purpose flour
-
¼ cup unsweetened cocoa powder
-
¼ tsp baking powder
-
¼ tsp salt
For the Oreo Layer:
-
12–15 Oreo cookies, roughly chopped
-
½ cup semi-sweet or dark chocolate chips (optional but recommended)
For Topping (Optional):
-
3–5 extra Oreos, crushed for garnish
-
White chocolate drizzle or cream cheese frosting (optional)
Instructions
Step 1: Prep Your Pan and Oven
-
Preheat the oven to 350°F (175°C).
-
Line an 8×8-inch baking pan with parchment paper or grease well with nonstick spray.
Step 2: Make the Red Velvet Brownie Batter
-
In a large bowl, whisk together melted butter, granulated sugar, and brown sugar until smooth and glossy.
-
Add eggs, red food coloring, and vanilla extract. Whisk until fully combined.
-
Sift in flour, cocoa powder, baking powder, and salt. Fold gently with a spatula until just combined—don’t overmix.
Step 3: Add Oreos and Chocolate Chips
-
Gently fold in the chopped Oreos and chocolate chips (if using) until evenly distributed throughout the batter.
Step 4: Bake the Brownies
-
Pour the batter into the prepared pan and spread evenly.
-
Press a few extra crushed Oreos on top for a dramatic finish.
-
Bake for 28–32 minutes, or until a toothpick inserted comes out with a few moist crumbs (not wet batter).
-
Let the brownies cool completely in the pan on a cooling rack.
Step 5: Slice and Serve
-
Once cooled, lift the brownies out using the parchment paper.
-
Slice into squares or bars.
-
Drizzle with white chocolate or top with a swirl of cream cheese frosting for extra decadence (optional but amazing).
Notes
Don’t Overbake – Brownies continue to cook slightly as they cool. A toothpick with a few crumbs means they’re ready.
Use Gel Food Coloring – For a deeper red without altering the texture.
Make It Extra Fudgy – Slightly underbake by 1–2 minutes if you love gooey centers.
Chill Before Cutting – For cleaner, neater slices, refrigerate for 30 minutes before slicing.
Add Frosting – Cream cheese frosting adds that classic red velvet touch.
- Prep Time: 15 minutes
- Cook Time: 30 minutes
- Cuisine: American
Find it online: https://donerecipe.com/red-velvet-oreo-brownies/


