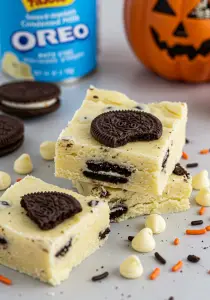
Looking for a fun and spooky treat that’s easy to make? This Halloween Oreo Fudge is the perfect no-bake dessert! With layers of creamy white chocolate, crunchy Halloween Oreos, and a festive touch of sprinkles, this fudge is a must-have for your Halloween celebrations.
Want more easy holiday recipes? Subscribe now to get the best seasonal treats delivered straight to your inbox!
Why You’ll Love This Recipe
- No-Bake & Easy – Just melt, mix, and chill!
- Festive & Fun – Perfect for Halloween parties or trick-or-treat snacks.
- Rich & Creamy – Made with white chocolate and sweetened condensed milk.
- Crunchy & Chocolaty – The Oreos add the perfect texture!
Ingredients You’ll Need
- White Chocolate Chips (3 cups) – The creamy base of the fudge.
- Sweetened Condensed Milk (1 can, 14 oz) – Adds sweetness and smooth texture.
- Butter (2 tbsp, unsalted) – Helps create a soft, melt-in-your-mouth consistency.
- Vanilla Extract (1 tsp) – Enhances the flavor.
- Halloween Oreos (20 cookies, roughly chopped) – The star ingredient! Use the orange-filled ones for extra Halloween vibes.
- Halloween Sprinkles (¼ cup, optional) – For a festive touch.
Tools You’ll Need
- 8×8-inch baking dish
- Parchment paper
- Microwave-safe bowl or saucepan
- Spatula
- Knife for cutting squares
How to Make Halloween Oreo Fudge
Step 1: Prepare the Baking Dish
- Line an 8×8-inch baking dish with parchment paper, leaving an overhang for easy removal.
Step 2: Melt the White Chocolate
- In a microwave-safe bowl, combine the white chocolate chips, sweetened condensed milk, and butter.
- Microwave in 30-second intervals, stirring each time, until fully melted and smooth.
- Stir in the vanilla extract.
Step 3: Fold in the Oreos
- Gently fold in most of the chopped Halloween Oreos, saving some for the top.
Step 4: Pour & Decorate
- Pour the mixture into the prepared baking dish, spreading it evenly with a spatula.
- Press the remaining Oreos and Halloween sprinkles on top for a festive finish.
Step 5: Chill & Set
- Refrigerate for 2–3 hours or until completely set.
- Once firm, lift the fudge out using the parchment paper and cut it into squares.
Step 6: Serve & Enjoy!
- Serve at your Halloween party or wrap them up as spooky treats!
Tips for the Best Fudge
- Use High-Quality White Chocolate – This ensures a smooth and creamy texture.
- Don’t Overheat – Melt the chocolate in short intervals to avoid burning.
- For a Swirled Look – Add a few drops of orange food coloring and swirl with a toothpick.
- For Extra Crunch – Sprinkle crushed Oreos on top before chilling.
Storing & Freezing
- Refrigerate: Store in an airtight container for up to 1 week.
- Freeze: Wrap individual pieces in plastic wrap and freeze for up to 2 months. Thaw in the fridge before serving.
Frequently Asked Questions
Can I use regular Oreos?
Yes! But the Halloween Oreos add a fun orange color to the fudge.
Can I use dark chocolate instead of white chocolate?
Absolutely! It will be a richer, darker version, but just as delicious.
Can I make this ahead of time?
Yes! You can make it up to 3 days in advance and store it in the fridge.
Conclusion
This Halloween Oreo Fudge is a spooky, sweet treat that’s perfect for the season! It’s creamy, crunchy, and loaded with chocolatey goodness—a guaranteed crowd-pleaser at any Halloween gathering.
Tried this recipe? Leave a review and share your spooky fudge photos!
Preparation Time: 10 minutes
Chilling Time: 2–3 hours
Cuisine: American
Nutritional Information (Per Piece):
Calories: 180 | Protein: 2g | Carbohydrates: 22g | Fat: 9g | Sugar: 18g | Sodium: 70mg
Halloween Oreo Fudge
- Total Time: 0 hours
Description
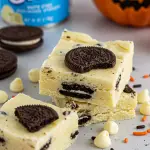
Looking for a fun and spooky treat that’s easy to make? This Halloween Oreo Fudge is the perfect no-bake dessert! With layers of creamy white chocolate, crunchy Halloween Oreos, and a festive touch of sprinkles, this fudge is a must-have for your Halloween celebrations.
Want more easy holiday recipes? Subscribe now to get the best seasonal treats delivered straight to your inbox!
Ingredients
-
White Chocolate Chips (3 cups) – The creamy base of the fudge.
-
Sweetened Condensed Milk (1 can, 14 oz) – Adds sweetness and smooth texture.
-
Butter (2 tbsp, unsalted) – Helps create a soft, melt-in-your-mouth consistency.
-
Vanilla Extract (1 tsp) – Enhances the flavor.
-
Halloween Oreos (20 cookies, roughly chopped) – The star ingredient! Use the orange-filled ones for extra Halloween vibes.
-
Halloween Sprinkles (¼ cup, optional) – For a festive touch.
Instructions
Step 1: Prepare the Baking Dish
-
Line an 8×8-inch baking dish with parchment paper, leaving an overhang for easy removal.
Step 2: Melt the White Chocolate
-
In a microwave-safe bowl, combine the white chocolate chips, sweetened condensed milk, and butter.
-
Microwave in 30-second intervals, stirring each time, until fully melted and smooth.
-
Stir in the vanilla extract.
Step 3: Fold in the Oreos
-
Gently fold in most of the chopped Halloween Oreos, saving some for the top.
Step 4: Pour & Decorate
-
Pour the mixture into the prepared baking dish, spreading it evenly with a spatula.
-
Press the remaining Oreos and Halloween sprinkles on top for a festive finish.
Step 5: Chill & Set
-
Refrigerate for 2–3 hours or until completely set.
-
Once firm, lift the fudge out using the parchment paper and cut it into squares.
Step 6: Serve & Enjoy!
-
Serve at your Halloween party or wrap them up as spooky treats!
Notes
-
Use High-Quality White Chocolate – This ensures a smooth and creamy texture.
-
Don’t Overheat – Melt the chocolate in short intervals to avoid burning.
-
For a Swirled Look – Add a few drops of orange food coloring and swirl with a toothpick.
-
For Extra Crunch – Sprinkle crushed Oreos on top before chilling.
- Prep Time: 10 minutes
- Chilling Time: 2-3 hours
- Cuisine: American
