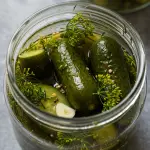
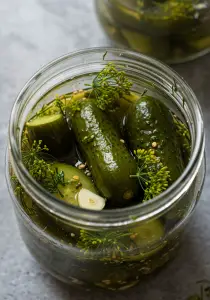
Crunchy, tangy, and packed with garlicky goodness, these Garlic Dill Pickles are a must-try for pickle lovers! This easy homemade recipe delivers that classic deli-style flavor without any complicated steps. Perfect for snacking, burgers, or sandwiches, these pickles will quickly become a household favorite!
Why You’ll Love This Recipe
- Crispy & Flavorful – Fresh cucumbers brined in a garlicky, herby vinegar solution.
- Quick & Easy – No canning required, just refrigerate!
- Perfect Balance – Just the right mix of salty, sour, and garlicky flavors.
Ingredients You’ll Need
- Pickling cucumbers (6–8 small, or 4–5 medium)
- Fresh dill (1 large bunch)
- Garlic cloves (4–6, smashed)
- White vinegar (1 ½ cups)
- Water (1 ½ cups)
- Kosher salt (2 tablespoons)
- Sugar (1 teaspoon, optional)
- Whole black peppercorns (1 teaspoon)
- Mustard seeds (1 teaspoon)
- Red pepper flakes (½ teaspoon, optional for heat)
Tools You’ll Need
- Glass jars with lids (quart-sized)
- Small saucepan
- Cutting board & knife
How to Make Garlic Dill Pickles
1. Prepare the Cucumbers
Wash the cucumbers and slice them into spears or rounds, or leave them whole for extra crunch.
2. Pack the Jars
Divide the garlic cloves, fresh dill, peppercorns, mustard seeds, and red pepper flakes (if using) evenly between the jars. Pack the cucumbers tightly inside.
3. Make the Brine
In a small saucepan, combine water, vinegar, salt, and sugar (if using). Bring to a boil, stirring to dissolve the salt. Remove from heat and let cool slightly.
4. Pour the Brine
Carefully pour the hot brine into the jars, ensuring the cucumbers are fully submerged. Leave a little space at the top.
5. Seal & Refrigerate
Seal the jars tightly and let them cool to room temperature. Refrigerate for at least 24 hours before enjoying (for best flavor, wait 48 hours).
6. Enjoy!
Once pickled, these crisp and tangy pickles are ready to enjoy!
Serving Suggestions
- Add to sandwiches or burgers for extra crunch.
- Serve alongside cheese & charcuterie boards.
- Chop into salads or potato salad for tangy flavor.
Storage Tips
- Refrigerate: These pickles last up to 2 months in the fridge.
- Canning Option: For longer storage, process the jars in a water bath for 10 minutes.
Frequently Asked Questions
Can I use apple cider vinegar instead of white vinegar?
Yes! Apple cider vinegar adds a slightly sweeter tang but works well.
Why did my pickles turn soft?
Overripe cucumbers or hot brine can make them soft. Use firm cucumbers and let the brine cool slightly before pouring.
Can I make these spicy?
Absolutely! Add sliced jalapeños or extra red pepper flakes for a kick.
Conclusion
These Garlic Dill Pickles are easy to make and packed with flavor! Whether you like them extra garlicky, a little spicy, or classic and crisp, this homemade recipe is a must-try.
Let me know if you try them! Don’t forget to share your photos and leave a review.
Preparation Time: 10 minutes
Pickling Time: 24 hours (best after 48 hours)
Cuisine: American
Nutritional Information (Per Pickle Spear):
Calories: 5 | Carbohydrates: 1g | Sodium: 150mg | Fiber: 0.5g | Sugar: 0g

Garlic Dill Pickles
- Total Time: 24 hours 10 minutes
Description
Crunchy, tangy, and packed with garlicky goodness, these Garlic Dill Pickles are a must-try for pickle lovers! This easy homemade recipe delivers that classic deli-style flavor without any complicated steps. Perfect for snacking, burgers, or sandwiches, these pickles will quickly become a household favorite!
Ingredients
- Pickling cucumbers (6–8 small, or 4–5 medium)
- Fresh dill (1 large bunch)
- Garlic cloves (4–6, smashed)
- White vinegar (1 ½ cups)
- Water (1 ½ cups)
- Kosher salt (2 tablespoons)
- Sugar (1 teaspoon, optional)
- Whole black peppercorns (1 teaspoon)
- Mustard seeds (1 teaspoon)
- Red pepper flakes (½ teaspoon, optional for heat)
Instructions
1. Prepare the Cucumbers
Wash the cucumbers and slice them into spears or rounds, or leave them whole for extra crunch.
2. Pack the Jars
Divide the garlic cloves, fresh dill, peppercorns, mustard seeds, and red pepper flakes (if using) evenly between the jars. Pack the cucumbers tightly inside.
3. Make the Brine
In a small saucepan, combine water, vinegar, salt, and sugar (if using). Bring to a boil, stirring to dissolve the salt. Remove from heat and let cool slightly.
4. Pour the Brine
Carefully pour the hot brine into the jars, ensuring the cucumbers are fully submerged. Leave a little space at the top.
5. Seal & Refrigerate
Seal the jars tightly and let them cool to room temperature. Refrigerate for at least 24 hours before enjoying (for best flavor, wait 48 hours).
6. Enjoy!
Once pickled, these crisp and tangy pickles are ready to enjoy!
Notes
- Refrigerate: These pickles last up to 2 months in the fridge.
- Canning Option: For longer storage, process the jars in a water bath for 10 minutes.
- Prep Time: 10 minutes
- Pickling Time: 24 hours (best after 48 hours)
- Cuisine: American


